WordPress self-hosting offers flexibility and control. It’s a popular choice for many website owners.
Starting your journey with WordPress self-hosting can feel overwhelming. You get to pick your own domain name, choose a hosting provider, and install WordPress yourself. This gives you full control over your site’s functionality and appearance. Unlike WordPress. com, self-hosting allows for more customization and advanced features.
You can install plugins, themes, and make changes to the code. This freedom comes with responsibility. You will handle updates, backups, and security. But don’t worry, it’s not as hard as it sounds. With the right guidance, you can set up and manage your own WordPress site successfully. This introduction will help you understand the essentials of WordPress self-hosting.

Introduction To WordPress Self Hosting
WordPress self hosting is a powerful option for website owners. It provides control over your site’s data and functionality. Unlike WordPress.com, self hosting offers full customization. This means you can create a site that truly reflects your vision. Let’s dive into the benefits and see who should consider self hosting.
Benefits Of Self Hosting
Self hosting gives you complete control over your website. You can install any theme or plugin. This allows for endless customization. You also own all your content. This means no third-party can remove it. Self hosting also improves your site’s performance. You can choose a hosting provider with faster servers. This leads to quicker load times. Additionally, you can optimize your site’s security. You can install security plugins and take other measures to protect your data.
Who Should Consider Self Hosting
Self hosting is ideal for those who need full control. If you want to customize every aspect, self hosting is for you. It’s also great for businesses. Owning your content is crucial for branding. Bloggers who want more flexibility should also consider it. If you plan to monetize your blog, self hosting is a smart choice. Finally, developers often prefer self hosting. It provides the freedom to experiment and innovate.
Choosing A Hosting Provider
Choosing the right hosting provider is crucial for your WordPress site. The right provider ensures your site runs smoothly. It also impacts your site’s speed and security. So, it’s important to make an informed choice.
Types Of Hosting Plans
There are several types of hosting plans available. Shared hosting is the most basic. It is affordable but shares resources with other sites. This can affect your site’s performance.
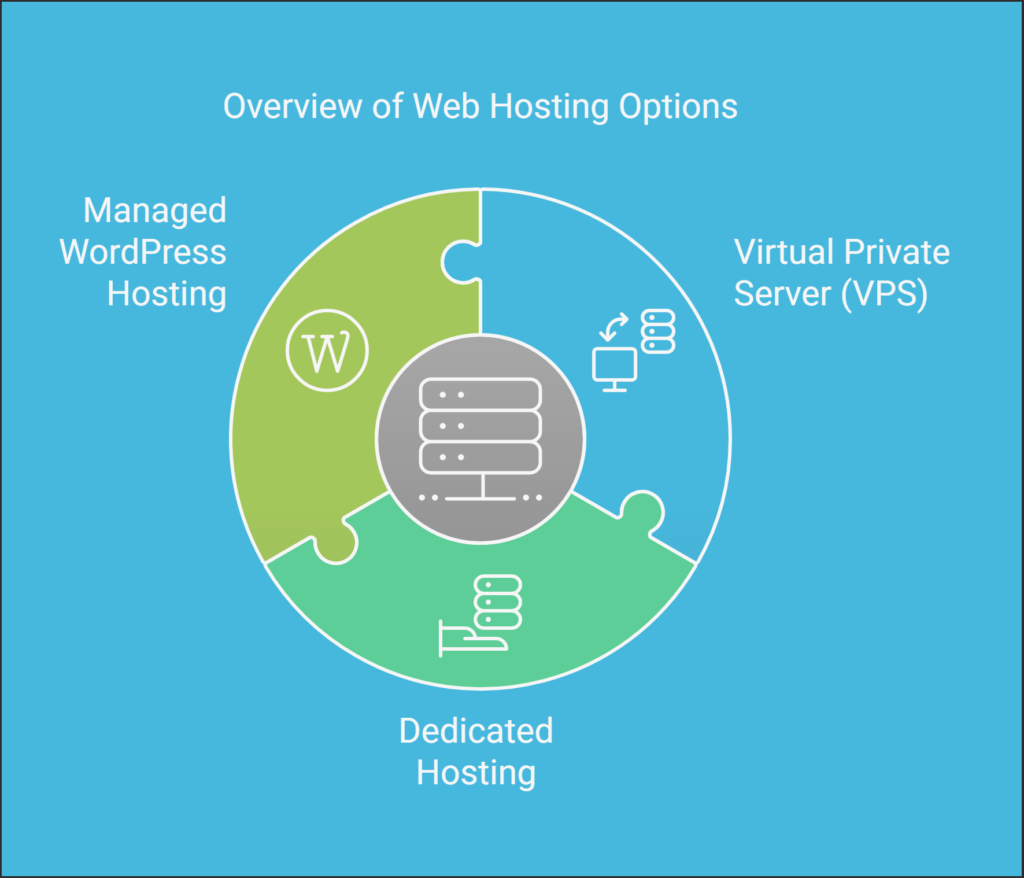
Virtual Private Server (VPS) hosting offers more resources and control. It is more expensive than shared hosting. But, it provides better performance and security.
Dedicated hosting is the most powerful option. You get an entire server for your site. This plan is best for large sites with high traffic. It is also the most expensive.
Managed WordPress hosting is another option. It is designed specifically for WordPress sites. This plan includes updates, backups, and security. It is a bit pricier, but offers peace of mind.
Top Hosting Providers
Several hosting providers are popular for WordPress sites. Bluehost is a favorite for beginners. They offer affordable plans and good support.
SiteGround is known for excellent customer service. They provide fast and secure hosting. Their plans are a bit more expensive.
HostGator is another reliable option. They offer a range of plans. HostGator is known for their uptime and support.
WP Engine specializes in managed WordPress hosting. They offer top-notch performance and security. Their plans are on the higher end.
Choosing the right provider depends on your site’s needs. Consider your budget, traffic, and required features. Take your time to research and pick the best fit.
Setting Up Your Hosting Account
Setting up your hosting account is a crucial step for your WordPress website. This process involves registering a domain name and linking it to your hosting account. These steps are essential for making your website accessible to others.
Registering A Domain Name
Your domain name is your website’s address on the internet. Choosing the right domain name is vital. It should be short, memorable, and relevant to your site’s content. Here are the steps to register your domain name:
- Choose a domain name registrar, such as GoDaddy or Namecheap.
- Search for your desired domain name to check its availability.
- Select the domain name and proceed to the registration process.
- Fill in your personal details as required.
- Complete the payment to secure your domain name.
Once you have completed these steps, your domain name is officially registered. You can now move on to linking it with your hosting account.
Linking Domain To Hosting
After registering your domain, the next step is to link it to your hosting account. This step ensures that visitors can find your website using your domain name. Follow these steps to link your domain to your hosting account:
- Log in to your hosting account dashboard.
- Locate the domain management section.
- Select the option to add a new domain.
- Enter your registered domain name.
- Update your domain’s DNS settings to point to your hosting server.
Here is a table with common DNS settings for popular hosting providers:
| Hosting Provider | DNS Settings |
|---|---|
| Bluehost | ns1.bluehost.com, ns2.bluehost.com |
| SiteGround | ns1.siteground.com, ns2.siteground.com |
| HostGator | ns1.hostgator.com, ns2.hostgator.com |
After updating your DNS settings, it may take up to 48 hours for the changes to propagate. Once done, your domain will point to your hosting account, making your website live.
Installing WordPress
Setting up your own WordPress site is exciting. It can be done in two main ways: One-Click Installation and Manual Installation. Both methods are straightforward and ensure your website is up and running quickly.
One-click Installation
Many hosting providers offer a One-Click Installation option. This is the simplest way to install WordPress. Here’s how it works:
- Log in to your hosting account.
- Navigate to the control panel (often called cPanel).
- Look for the WordPress installer. It might be under a section like “Website” or “Applications”.
- Click on the WordPress icon and follow the on-screen instructions.
- Fill in your site details, such as site name and admin information.
- Click “Install” and wait for the process to complete.
Once done, you’ll receive a link to your new site and the admin dashboard. This method is perfect for beginners.
Manual Installation
Manual installation requires a bit more effort. Here’s a step-by-step guide:
- Download the latest version of WordPress from wordpress.org.
- Unzip the downloaded file to a folder on your computer.
- Upload these files to your web server using an FTP client. Place them in the root directory (often named public_html).
- Create a MySQL database for WordPress on your web server. Take note of the database name, username, and password.
- Rename the wp-config-sample.php file to wp-config.php.
- Open wp-config.php in a text editor and enter your database details.
- Save the file and close the editor.
- In your browser, go to your website URL to start the installation script.
- Follow the on-screen instructions to complete the installation.
Once finished, you can log in to the WordPress admin dashboard. This method provides more control over the setup.
Configuring Your WordPress Site
After installing WordPress on your server, it’s time to configure your site. This step ensures your website runs smoothly and provides a good user experience. Follow the steps below to set up your WordPress site efficiently.
Basic Settings
Start with the basic settings to get your site up and running. Navigate to the Settings menu in your WordPress dashboard.
- Site Title and Tagline: Set your site title and tagline in General Settings.
- Timezone and Date Format: Choose your timezone and preferred date format.
- Permalink Structure: Go to Permalinks and select Post name for SEO-friendly URLs.
- Reading Settings: Set your homepage to display a static page or your latest posts.
Ensure these settings are correct to avoid issues later.
Installing Essential Plugins
Plugins add functionality to your WordPress site. Below are some essential plugins to install:
- Yoast SEO: Improves your site’s SEO.
- Akismet: Protects your site from spam comments.
- WP Super Cache: Increases your site’s loading speed.
- Jetpack: Provides security, performance, and site management features.
- UpdraftPlus: Backups your site automatically.
Install these plugins by navigating to Plugins > Add New in your dashboard. Search for each plugin, click Install, and then activate it.
| Plugin | Function |
|---|---|
| Yoast SEO | SEO optimization |
| Akismet | Spam protection |
| WP Super Cache | Speed enhancement |
| Jetpack | Security and performance |
| UpdraftPlus | Site backups |
These plugins are crucial for a well-functioning WordPress site. They help in SEO, security, speed, and backups.
Credit: themeisle.com
Customizing Your Website
Customizing your website on WordPress Self Hosting can be an exciting journey. You can create a unique look and feel that matches your brand. This process involves choosing the right theme and tweaking its settings to fit your needs.
Choosing A Theme
Start by exploring the WordPress theme directory. There are thousands of free and premium themes available. Choose a theme that reflects your website’s purpose. A clean, responsive design is crucial. It ensures your site looks good on all devices. Read user reviews and check ratings before making a decision.
Customizing Theme Settings
Once you have chosen a theme, it’s time to customize it. Navigate to the Appearance menu in your WordPress dashboard. Click on ‘Customize’ to access theme settings. You can change colors, fonts, and layout options. Use the live preview feature to see changes in real-time. This helps you make informed decisions without affecting the live site.
Don’t forget to upload your logo and favicon. These small details enhance your site’s branding. You can also add widgets to your sidebar or footer. Widgets can include recent posts, social media icons, or contact forms. They improve user experience and keep visitors engaged.
Maintaining Your WordPress Site
Maintaining your WordPress site is crucial for its performance and security. Regular upkeep ensures your site runs smoothly and is safe from threats. In this section, we will cover the essential aspects of site maintenance.
Regular Backups
Regular backups are vital for your WordPress site. They help you recover data in case of accidental loss or hacking.
- Use plugins like UpdraftPlus or BackupBuddy for easy backups.
- Store backups on external storage like Google Drive or Dropbox.
- Schedule backups to run automatically at regular intervals.
Having recent backups ensures you can restore your site quickly.
Updating Plugins And Themes
Plugins and themes need regular updates. Updates fix bugs, improve performance, and enhance security.
- Go to the Dashboard and click Updates.
- Review the available updates for plugins and themes.
- Click Update Now for each item.
Always check compatibility before updating to prevent conflicts.
Staying updated protects your site from vulnerabilities.
Enhancing Security
Enhancing the security of your WordPress self-hosted site is crucial. With the increasing number of cyber threats, taking proactive measures can protect your site from hackers and malware. In this section, we will discuss effective ways to enhance security, focusing on securing the login page and installing security plugins.
Securing Login Page
The login page is a common target for hackers. To secure it, follow these steps:
- Change the default URL: Modify the login URL from the default “wp-login.php” to something unique.
- Limit login attempts: Restrict the number of login attempts to prevent brute force attacks.
- Use two-factor authentication: Add an extra layer of security by requiring a second form of identification.
Additionally, make sure to use strong, unique passwords for all user accounts. A combination of uppercase, lowercase, numbers, and symbols is recommended.
Installing Security Plugins
Security plugins can provide an extra layer of protection for your WordPress site. Here are some popular plugins:
| Plugin | Features |
|---|---|
| Wordfence Security | Firewall, malware scan, and login security. |
| Sucuri Security | Website firewall, malware cleanup, and security monitoring. |
| iThemes Security | Brute force protection, file change detection, and strong password enforcement. |
These plugins offer various features like malware scanning, firewall protection, and login security. Choose the one that best suits your needs and keep it updated.
By securing the login page and installing reliable security plugins, you can significantly reduce the risk of security breaches. Stay vigilant and regularly monitor your site’s security to keep it safe.
Optimizing Performance
Optimizing performance is crucial for a successful WordPress self-hosted site. Faster load times improve user experience. They also boost search engine rankings. This section will cover techniques to enhance your site’s performance.
Improving Load Times
Slow websites frustrate users. They often leave before your site fully loads. Improving load times is essential. Start by choosing a reliable hosting provider. A good host ensures fast server response times.
Use a lightweight theme. Heavy themes slow down your site. Limit the use of plugins. Too many plugins can increase load times. Optimize images before uploading. Large images can slow down page speed. Compress them using tools like TinyPNG.
Minimize HTTP requests. Each element on a page requires a request. Reduce the number of elements. Combine CSS and JavaScript files. This reduces the number of requests.
Using Caching Plugins
Caching plugins are crucial for performance. They store static versions of your site. This reduces the load on the server. Popular caching plugins include W3 Total Cache and WP Super Cache. These plugins are easy to configure.
Enable browser caching. This stores static files on users’ devices. It speeds up return visits. Use a content delivery network (CDN). A CDN distributes your content globally. It reduces the distance between the server and users.
Regularly clear your cache. Cached files can become outdated. Clearing cache ensures users see the latest content.

Credit: anchor.host
Monetizing Your WordPress Site
Monetizing your WordPress site can generate income. It’s an exciting opportunity. Many website owners use various strategies to earn money. Let’s explore some effective methods.
Affiliate Marketing
Affiliate marketing is a popular way to earn money. You promote products from other companies. When users buy through your links, you earn a commission. It’s simple and effective.
To start, join affiliate programs related to your niche. Amazon Associates is a well-known option. Share honest reviews and recommendations. The more genuine your content, the more users will trust you. This trust leads to more sales and higher commissions.
Selling Products And Services
Sell your products or services directly on your site. This method is very effective. You have full control over pricing and inventory. You can sell digital products like eBooks, courses, or software. Physical products are another option.
Use WooCommerce to set up an online store. It is a popular plugin. It’s user-friendly and integrates well with WordPress. Offer services like consulting, coaching, or freelance work. Highlight your expertise and show customer testimonials. This builds trust and drives sales.
Frequently Asked Questions
What Is WordPress Self-hosting?
WordPress self-hosting is when you host your WordPress site on your own server. It gives you full control over your website’s customization and functionality.
How To Start With WordPress Self-hosting?
To start with WordPress self-hosting, you need a domain and hosting plan. Install WordPress on your server and customize your site as needed.
What Are The Benefits Of Self-hosting WordPress?
Self-hosting WordPress offers full control, customization, and better performance. You can install any plugin, theme, and optimize your site for SEO.
Is Self-hosting WordPress Expensive?
The cost of self-hosting WordPress depends on your hosting provider and plan. Generally, it’s affordable and offers better value for control and customization.
Conclusion
Choosing WordPress self-hosting offers many benefits. It gives you control. You customize your site as you wish. Costs are manageable, and the options are vast. You can scale your site as it grows. Security measures are in your hands. Support from the WordPress community is strong.
Start small, then expand. Enjoy the freedom and flexibility of self-hosting. It’s a smart choice for your website needs. Dive in and create something unique today.